If you have decided to purchase a whole-house (point-of-entry) water filtration system, I think you have made a great choice.
It should give you some good peace of mind knowing that 100% of the water that comes into your home will now have the contaminants removed or reduced that your particular point-of-entry (POE) filtration system targets.
With my many years of setting up advanced filtration systems for swimming pool water, I can tell you that installing a whole-home water filter is not something everyone can do. That’s why I tell most people they should consider having this professionally done.
If you are determined to install your whole-home filtration system yourself, then there are some specifics about the process that you should be aware of.
That’s what I will go over with you in this article. This includes instructing you as to what order to place multi-stage POE filtration systems in, what tools you will need for the job, and I will even provide you with a basic installation diagram.
By the time you are done reading, you should have a pretty good idea of how to install a whole house water filter system.
Table of Contents
What Location to Install Your Point of Entry Filter
The words point-of-entry in this question are a dead giveaway when it comes to locating most whole-home water filtration solutions. You will install them in an area that has enough space for them as close as you can to where the incoming city water line enters your home.
If your home is supplied by well water, then you will want to install the system on your incoming water line where it comes off of your well pump.
Once again, depending on the size of your new water filtration setup, you will need enough space to place the system and to move around it while performing maintenance on it.
Also, you will need to consider if you place the whole house filter before or after a pressure tank.
Whether your home is supplied by municipal or well water, the installation needs to be done before your oncoming waterline branches off and goes to other areas of your home.
The lone exception to this with these types of complete house water filtration systems is the water line that goes to your outside spigots.
That’s because there really is no need to filter that water. This will help extend the useful life of a carbon filter or any other filter media in the system.
Before or After Water Softener

Should you install your whole house filter before or after your water softener?
It depends…
Not all homes need a water softener. Testing your home’s water is the best way to figure out whether you need to install one along with your POE water filtration setup.
The best whole house water filtration systems often come with some type of water softening component or have it available as an option.
I will start by saying if you thought you were going to get a simple one-size-fits-all answer as to where you will place the water softener in your new filtration setup, guess again.
That’s because where it’s placed depends on what type of water supply you have.
Since water from municipal water supplies is of fairly good quality most of the time and there’s a good chance it’s been treated with chlorine, it’s best to place your drinking water softener after the other stages of your whole-home water filter.
This is the recommended water softener placement for city water for two reasons. One is that chlorine in your water can harm the ion exchange resins in your water softener and the filter media in almost every POE system will remove chlorine.
The other reason to locate a water softener after the whole-house filter when you have municipal water is that it will avoid low water pressure issues with the system when the water softener is in its regeneration (cleaning) cycle.
If your home is supplied by water from a well it’s the opposite. You will want to install your water softener before the other stages of your point-of-entry filtration system.
This is done because it will guarantee you will get the most pressure possible going to your water softener to make its backwash cycle (regeneration cycle) more impactful.
The only exception to this rule is if you chlorinate the water in your well. Then, the same as you do when you have chlorinated city water, you will place your water softener after your whole-house filter.
Installation Diagram
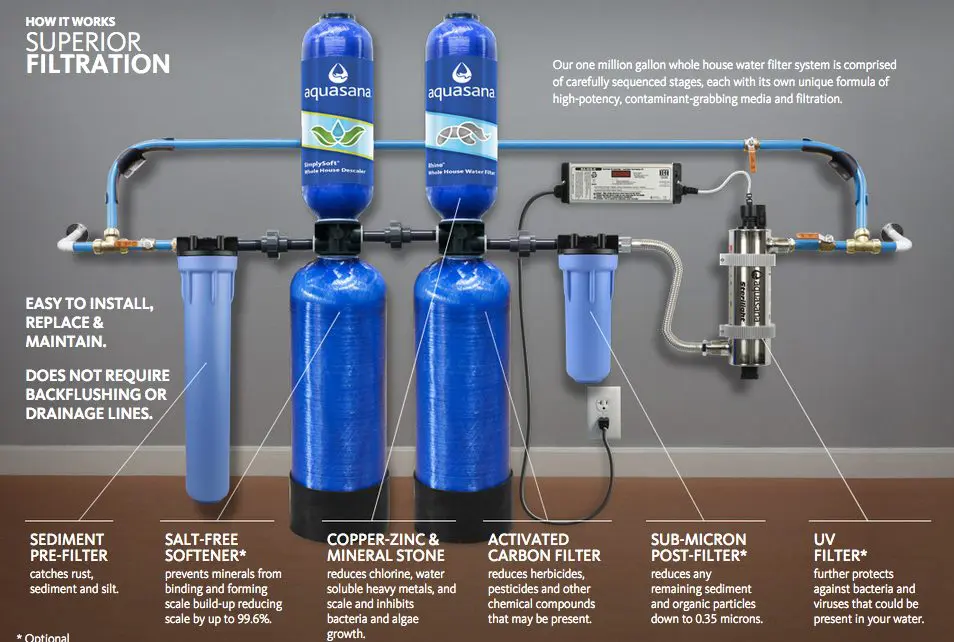
Here is an installation diagram of a favorite whole house filter system of mine. It’s called the Aquasana Rhino 1,000,000-gallon whole-home system.
It can be purchased with as little as 4 multiple filters that include a good carbon filter or in a full-blown version with some other filter options and add-ons as shown in the photo below.

As a bonus, you can watch a YouTube video as to how this particular whole-home water filter is installed.
Parts & Tools Needed
Before you can begin installing your new point-of-entry water filter, you have to make sure that you have the right tools, parts, and other materials for the job. Those on the lists below should get you to the end of the installation with no problems.
Tools:
- Small- and medium-sized pairs of tongue and groove pliers
- Phillips screwdriver
- Slotted screwdriver
- Box knife
- Pipe cutter or hacksaw
- Fine grit sandpaper (to remove burrs from metal or PVC pipe cuts)
- Drill
- Masonry or regular drill bits
- Wet-Dry Vac (in case of excess water accumulation)
- Bucket (to catch drips)
Parts & Materials:
- Whole-house water filtration system
- Support components (if they are not included w/the system – i.e., water softeners, UV light filters, etc.…)
- Copper pipe or PVC tubing (If your incoming water line is made from copper pipe, I would get the parts necessary to transition it to PVC to make connecting the components of the POE filtration system much easier to do)
- Assorted copper and plastic pipe fittings (for the type of water pipe that’s used for your income water line)
- Push fittings
- Quick connections
- Shut-off valves
- Bypass valves (recommended)
- Pressure gauges (might be included)
- Pipe brackets
- Screws
- PVC glue or solder (braze)
- Teflon tape
- Dry rags
How to Install a Whole House Water Filter System (Step by Step Guide)

OK, now you are ready to start the whole house water filter installation so you and your family can enjoy some healthier drinking water. Here is how I recommend that you go about doing that:
Step 1: Read and follow the manufacturer instructions that come with your new point-of-entry water system. I can’t emphasize enough the importance of following the specific manufacturer instructions!
This is important because it will alert you to any special steps that you need to take during the installation process to get your new whole-home filter to operate correctly.
Step 2: Next, I like to start by laying out all of my whole-house water filter components and any add-ons corresponding to where I will be placing them in the setup.
I do this because it’s easier to spot and rework any potential installation problems before you start the process as opposed to when you are smack dab in the middle of it.
Remember to position your water softener according to what was discussed above.
Step 3: It’s SUPER IMPORTANT to close the shut off valve on your incoming water supply before cutting into your incoming water feed line. Prepare to clean up a big mess if you don’t.
Step 4: Open the valves on your faucets and spigots to drain any water remaining in the lines and to relieve the pressure inside the pipes too.
Step 5: It’s time to make your first cut to tap into the incoming water supply pipe. Cut out a big enough section of pipe to run the length of the setup you have laid out on the floor.
Step 6: Install a shut off valve at both ends of the incoming water pipe that were cut. Close those valves just to keep any more water from coming out of the line.
It’s also a good idea to install a bypass line at this time too. Be sure to add a bypass valve at the beginning and end of this line where you cut pipe openings.
If there is no pressure gauge or pressure monitor on the system itself, then now is a good time to tap those in near the beginning and the end of the water supply line that was cut.
Secure the bypass line and each bypass valve to the wall and any other loose sections of pipe with the appropriate style of brackets.
Step 7: Now it’s time to plumb in the system and any add-ons in the order you laid them out on the floor
Connect each component with plumbing pipe (leave enough space between them to service them) and it’s a great idea to install the push fittings between each component too.
This makes it easier to do such things as clean the system and change the filters.
Any threaded pipe connections should also get a wrap or two of Teflon tape to ensure a tight seal. Also, make sure each system filter housing has its O-rings in place where necessary and that you secure tightly the top of each filter housing and pre filter.
The carbon filters on the system are the ones that this will most likely apply to. Do this for the filter housings of any add-on components and any pre filter housings too.
Step 8: Double-check all the clamps, couplings, filter housings, and pipe connections to make sure they appear to be sealed well. Once this is done you can open the shut off valves to the system and then turn the water back on and check for leaks.
Step 9: Once you’ve opened the shut off valve and water is coming out of your faucets and spigots without air you can go ahead and shut those off again.
Step 10: If you have old copper pipe that is used as a ground for your home, you will have to attach a new ground wire by adding grounding clamps at both ends of the copper pipe where it was cut to complete the ground circuit.
When to Hire A Professional Or DIY
For most people who know how to do plumbing, I don’t feel whole house water filter installation is that difficult a DIY project.
There are two tricky parts when it comes to installing any type of whole-home water filter. The one that you will definitely have to deal with is tapping into the incoming water line in your home not once but twice.
Once to take the water to your POE filter setup and once to take the filtered water back into your main water line.
If your incoming water line is copper you will need to know how to braze the necessary connections together to make them watertight. PVC lines are easier to splice into but still require some plumbing knowledge to do them right.
The other somewhat complicated part of a whole-house water filtration system installation is if you have parts on it that require electricity to run.
If you don’t have an electrical system or plug near where you are placing your new point-of-entry filter setup, then you will need to install an electrical hookup.
This is something that you never want to attempt to do if you have not been trained to safely work around electricity.
So, if the above-mentioned phases of a whole house filtration system make you pause to think for even a few seconds as to whether or not you can handle them, I would strongly recommend that you consider hiring a professional plumber or another tradesman to do the job.
Summing Up Whole-House Water Filter Installations
Chances are when you decide to purchase a whole-home water filtration system, you will be making a little bit of an investment to do that. You also are most likely looking to add filtered water to your diet to keep you and your family healthier.
That means setting up your new POE filter is something that you absolutely must get right to maximize your benefit from it. Whole house water filters make a great addition to any home if proper installation steps are followed.
So, if there is any doubt in your mind at all as to if you know how to install a whole house water filter system, then don’t take any chances for the little extra money that it will cost you to pay a professional to do the job.


