

If you are looking to buy a reverse osmosis filtration system, then you are about to make a smart purchase that should significantly improve the quality of your drinking water.
You also must be aware that these are not the easiest water filtration devices to install. That’s because setting up reverse osmosis systems has some tricky aspects to it.
Please don’t let what I just said discourage you from purchasing one of these elite water filtration devices. That’s because I am about to explain to you exactly how to install a reverse osmosis system.
I will provide you with an installation diagram of a popular under sink reverse osmosis water filter, tell you what tools you will need to gather together to install it, and then go over the complete step-by-step installation process for it.
Table of Contents
Reverse Osmosis System Installation Diagram
For this tutorial, I chose to give you instructions on how to install the iSpring RCC7AK 6-Stage Reverse Osmosis System.
That’s because it’s one of the most difficult under-sink RO filter setups to install. If you can install it, then you can install any under sink or any quality countertop RO water filter that’s made.
It’s also worth noting that the iSpring RCC7AK made our list of the best RO filtration systems. If you take a look at the photo below at what its advanced 6-stage filter setup can remove, it should come as no surprise that this reverse osmosis filter made that list.

Here is a diagram showing how all of those filtration stages come together to produce some high-quality H2O.
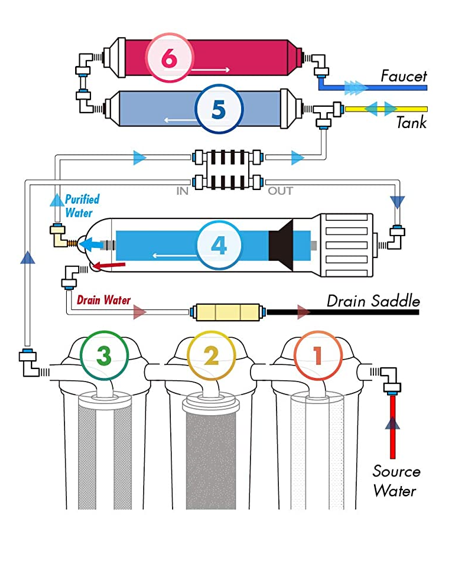
Although it may not look like it, the installation of this quality under sink water filter is fairly straightforward.
How to Install a Reverse Osmosis System (Under-Sink & Countertop)
Looking at a diagram is nice but to get your finished reverse osmosis filter working right, you will have to connect all the components properly. Here are the actual steps involved when it comes to installing the iSpring RCC7AK.
Step 1: Familiarize yourself with the manufacturer’s installation instructions
I can’t emphasize enough how important it is to read and understand the installation instructions that were provided by the manufacturer of your new reverse osmosis filtration system. Do this BEFORE you start the actual installation process.
Step 2: Installation preparation
Start by taking the time to get together these essential tools for doing RO filter installation.
Required Installation Tools & Items:
- Electric drill
- ½” hollow diamond hole saw
- ¼” drill bit
- Adjustable wrench
- Flashlight
- Phillips screwdriver
- Utility knife
- Teflon tape
- Clean rags
Once these are assembled, you will next locate the shutoff valve under your kitchen sink for its water supply.
Turn this valve clockwise as far as it will go to shut off the water supply to the sink. Also, open the valve on your kitchen sink’s faucet to release any remaining pressure in the system.
Also, be aware that RO systems that do not have internal or external booster pumps will need at least 40 PSI in your water system for them to work properly.
Step 3: Preassemble the filtration components
I like to place the various filters for each stage into their assigned compartments and seal them up tightly before I begin the installation process.
This is against the advice of some RO system manufacturers but I think it can be hard to insert the filters once the system frame has been put in place.
This is totally up to you how you do this phase of the installation project.
Here is a YouTube filter change video that you can use to see how the different filters on this quality RO system are put in place.
In this video, you will notice how important it is to have the necessary O-rings in place, the right filters in the right chambers, and to have the filter canisters tightened snuggly so they do not leak.
Step 4: Install the feed water adapter

Find the feed water adapter (AFW for short- don’t ask me why) pictured above. This is what attaches to the cold water supply line.
Check to make sure the O-ring is securely in place that is supposed to be on the female end of the adapter. Next disconnect the kitchen faucet connector that runs to the cold water line shutoff valve.
While making sure that you are on the supply side of the valve on the cold water line, next twist the female end of the AFW valve onto the exposed end of the cold water shutoff valve.
After that, make sure that the AFW valve is in a closed position. Now you have to reattach the loose kitchen faucet connector to the feed water adapter.
To complete this step, you will then connect the ¼” red tubing (not all brand RO filter systems will have color-coded tubing and the tubing attachment positions may be different) to the newly attached AFW valve.
Step 5: Faucet Installation

One of the unique characteristics of several reverse osmosis filtration setups is that they come with their own faucet for dispensing purified water.
If you don’t have a predrilled hole in your kitchen counter where this faucet can be placed, then you will need to drill a hole in your countertop to install the included faucet. Most of the time this requires the use of the ½” hollow diamond hole saw that was on your necessary tools list.
Once you have a hole big enough for the bottom of the sink faucet to be placed through it, then insert the threaded portion into the hole. Make sure there is no protective paper or plastic left in the faucet before doing this.
Have someone hold the faucet in place while you place the black rubber washer over the threads and then tighten the rubber washer to the bottom of the counter by threading on the supplied lock washer and nut (see below).
Step 6: Attach the Drain Saddle Valve
One of the biggest drawbacks to using reverse osmosis filtration is that the RO membrane requires cleaning every month or sooner depending on your incoming water quality.
The reverse osmosis system does this cleaning utilizing what’s known as backwashing. A process which also produces wastewater and that wastewater needs to go down the drain pipe.
So, take your 1/8” regular drill bit and drill a hole in your sink’s drain line. Then, locate the drain saddle clamp that comes with the supplied parts (see below).

Place that drain saddle clamp so the outlet connection on it sits directly over the hole you just drilled in the drain line pipe. Tighten the screw so both halves of the drain saddle clamp are tight against the pipe.
Now it’s time to place the black tubing inside the threaded outlet connection on the drain saddle clamp and tighten the nut on it to secure the pipe in place.
Step 7: Install Tank Shut-off Valve (TSV)
This particular model RO system has a purified water storage tank because it produces filtered water so slowly. You will need to attach the included TSV tank valve to the threaded stem on the top of the water storage tank.
All you have to do is put several wraps of Teflon tape (wrap clockwise) on the exposed threaded stem on the tank and then hand tighten the tank valve on those threads until it’s snug.
Step 8: Plastic Tubing installation
At this point of your reverse osmosis filter hookup, you have completed almost every step. As you move back a little and look at what you have done, you will notice that you have some color-coated tubing left over and some connections on the system that are still open-ended.
You can probably guess where that leftover tubing is now going to go.
The system will not work properly if all the open-ended connections do not have plastic tubing going into them and you can expect to be cleaning up a lot of water if you try to run the filtration system like that too.
The first tubing connection to be made is connecting the Feed Water Adapter (AFW) to the elbow fitting on the stage 1 sediment pre-filter (red tubing for this RO system model).
In almost all cases of a reverse osmosis filter installation, a line will run from the AFW to some type of pre-sediment filter.
Continue attaching the tubing to the pipes sequentially (in a way that makes sense) until all of the connections have tubing going into them.
Be sure the last filter stage is connected to the pure water faucet and your reverse osmosis stage drain port is connected to the tubing that comes from the quick connect port on the drain saddle clamp.
When you are finished with this step, all of the connections should be hooked up just the same as shown in the diagram below.

Step 9: Test the System for Leaks
Now that your RO system installation is complete, lastly, you will want to run the system and test it for leaks and to make sure that it’s operating correctly.
While you are doing this, keep in mind that even small leaks can cause costly structural problems with your sink cabinet area and floors if they drip steadily over several months.
Step 10: Use Common Sense Throughout the DIY installation process
Even if you have never even seen a reverse osmosis filter before, if you use common sense during the installation process it will help the job go along a lot smoother. If you did something during an installation that just does not seem right, then it was probably done wrong.
Double check your work against the installation manual often and if you get stuck on a certain aspect of your RO system installation don’t hesitate to call the manufacturer’s tech support line for help.
If you take your time and follow the instructions carefully, most reverse osmosis systems are not that hard to install.
Now it’s also time to enjoy the clear, crisp, and clean water that your new reverse osmosis system will produce.
When to Call A Professional for Help vs DIY
So, at what point will you be better off calling a professional to come and install your new reverse osmosis filtration system? There are a few ways that I would approach this.
For starters, you have to look at where the installation of the unit will take place. Most countertop RO systems can be easily installed by just about anyone that has even a small amount of mechanical aptitude.
The hardest part is usually connecting the device to the water line if required.

Under-sink and whole house reverse osmosis filter installations are a whole different animal. They often require several more difficult water line connections to be made and working in tight spaces is also the norm too.
This is why a majority of the time unless you are very mechanically inclined when it comes to plumbing, I recommend getting under-sink and whole-house RO systems professionally installed.
As I mentioned, I tell people that have just purchased reverse osmosis systems to read through the installation manual thoroughly before attempting to install their recently purchased RO filter.
If at any point while you are reading through your instruction manual and some part of the described installation process intimidates you more than just a little, then you are probably better off hiring an expert to do the job.
Reverse Osmosis is Always a Solid water Filtration Choice
If you have read many of my articles on this website, you will quickly realize that I am a big fan of RO filtration systems.
That’s because they do a great job removing bacteria and many other harmful water contaminants that other types of filters often don’t. This is a good trait because there is no such thing in this day and age as having water that’s of too high a quality.
Even city water can have high levels of harmful and unregulated water impurities in it. So, don’t take chances with your family’s health and be proactive when it comes to raising your home water quality.
Installing a good reverse osmosis system is a significant step in the right direction towards doing that. As you have read here, most people with a little plumbing aptitude will have few problems doing a DIY RO filtration system installation.

